
Navigation, dashboard information and data visibility
This article helps AssetIQ users understand the dashboard, the navigation available to their role, and how dashboard information relates to the underlying module records.
1. What the dashboard shows #
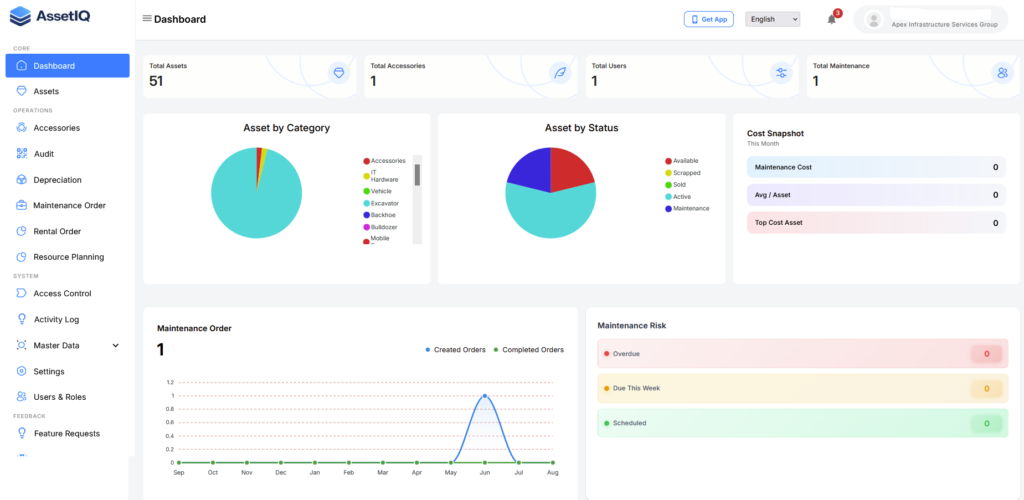
The dashboard is the main overview of information available to your account. It can show summary cards, counts and charts drawn from AssetIQ records. The exact items you see depend on your role, permissions, organisation setup and available data.
Your dashboard may look different from another user’s dashboard. This is expected when users have different permissions, entities, locations or operational responsibilities.
Main dashboard elements #
| Element | Purpose | How to use it |
| Summary cards | Provide quick totals or status indicators. | Use them to identify the areas that may need attention. |
| Charts | Present trends, comparisons or status distributions. | Review labels, time periods and filters before interpreting the result. |
| Navigation menu | Provides access to modules permitted for your role. | Select a module to open its list or working area. |
| Filters or selectors | Limit information to the selected scope when available. | Confirm the active selection before comparing dashboard totals. |
2. Understand role-based navigation #
AssetIQ displays navigation according to the permissions assigned to your user role. Modules that are not available to your role may be hidden or inaccessible.
- A system administrator manages user roles and permissions.
- Your navigation can change when your role or responsibilities change.
- Being able to see a module does not necessarily mean you can perform every action in that module.
- If a required module is missing, ask your AssetIQ administrator to review your access.
3. Use the dashboard #
- Sign in to AssetIQ.
- Confirm that the dashboard or permitted landing page opens.
- Review the navigation menu and confirm that the modules relevant to your role are available.
- Review the summary cards and note any totals or statuses requiring attention.
- Review each chart and confirm its title, labels, time period and active filters.
- Where a card or chart provides navigation, open the related module to review the underlying records.
- Return to the dashboard after completing your review or action.
Expected result #
The dashboard opens without error and shows only the information available to your assigned role and data scope. Dashboard totals and charts correspond to the underlying AssetIQ records when the same filters and scope are applied.
4. Understand counts and charts #
A dashboard figure is a summary of source records. Before treating two figures as inconsistent, confirm that you are comparing the same scope and conditions.
| Check | Why it matters | What to confirm |
| Role and permission | Users can have different data visibility. | Both users can access the same records and actions. |
| Entity or location | Information may be separated by organisation structure. | The same entity and location are selected. |
| Status | Cards may count only particular workflow statuses. | The module list uses the equivalent status filter. |
| Date period | Charts may cover a defined reporting period. | The list or report uses the same dates. |
| Refresh timing | Recent changes may need the page to refresh. | Reload the dashboard after saving source records. |
5. Troubleshoot dashboard differences #
A module is missing #
- Confirm that you signed in with the correct account.
- Ask your administrator whether the module is included in your assigned role.
- Sign out and sign in again after a permission change.
A count does not match the module list #
- Confirm the entity, location, date period and status scope.
- Clear unrelated list filters before comparing totals.
- Refresh the dashboard after adding or changing records.
- Record the dashboard figure and the filtered list result if the difference remains.
A chart is empty #
- Check whether the selected period contains relevant records.
- Confirm that your role can view the underlying data.
- Check whether an entity, location or other selector is limiting the result.
- Contact your administrator if expected records remain unavailable.
6. Related articles #
- Sign in to AssetIQ
- Reset your AssetIQ password
- Set up master data
- Manage users, roles and permissions
- Add your first asset
Next steps #
Now that you understand the AssetIQ dashboard, continue setting up your workspace and asset register.
- Set Up Master Data — Create the reference information required for assets and users.
- Invite Users and Assign Roles — Add team members and control what they can access.
- Add Your First Asset — Create and verify an individual asset record.
- Import Assets — Upload multiple asset records using the approved template.
- Generate Asset QR Codes— Create, download and test QR labels for your assets.


