
Create, download, print and verify QR labels for assets
Generate a QR code for an AssetIQ asset so authorised users can identify it quickly and open the correct record through the supported scanning workflow.
1. Before you generate a QR code #
Prerequisites #
- The asset record already exists in AssetIQ.
- Your role permits you to view the asset and generate or download its QR code.
- The asset identifier and key details have been checked for accuracy.
- You know the approved label size, material and printer settings for your organisation.
- A supported mobile device is available to test the finished label.
A QR code is a link to an AssetIQ record; it is not a substitute for a readable asset number. Include human-readable identification on the physical label.
Choose the correct record #
| Check | Why it matters | Recommended action |
| Asset identity | The QR code must belong to the intended physical asset. | Confirm asset name, number, serial or registration details. |
| Record status | Inactive or duplicate records can create misleading labels. | Use the current approved asset record. |
| Access scope | The label may be scanned by users with different roles. | Confirm authorised users can access the appropriate record. |
| Label location | Poor placement can make scanning difficult. | Choose a clean, visible and protected surface. |
2. Generate and download the QR code #
- Sign in to AssetIQ on the web.
- Open the asset list.
- Search for and open the required asset record.
- Confirm that the asset details match the physical asset to be labelled.
- Open the available QR-code action for the asset.
- Select the option to generate the QR code.
- Review the displayed QR code and its associated asset information.
- Download the QR image or file using the available download action.
- Save the file with a controlled name that identifies the asset.
- Open the downloaded file and confirm that the QR image is clear and complete.
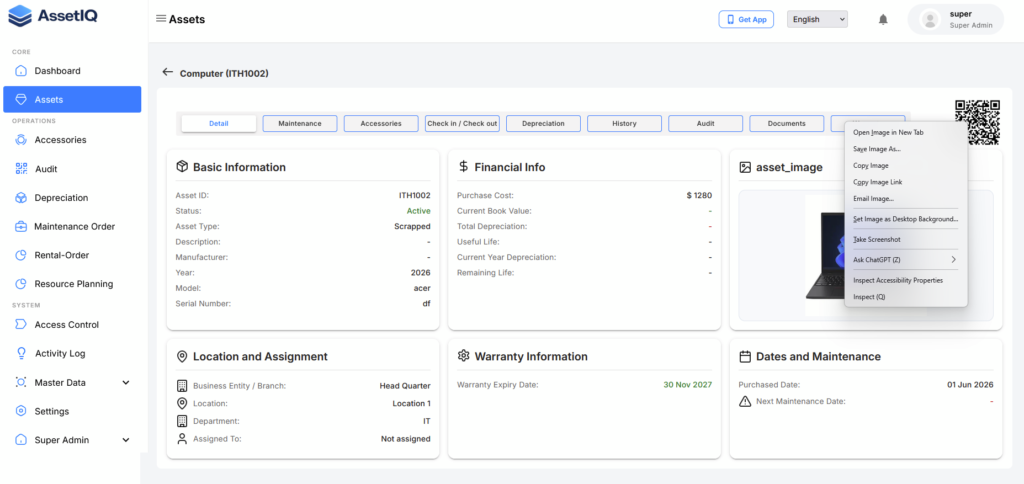
Expected result #
AssetIQ produces a readable QR image for the selected asset, and the file can be downloaded and opened without corruption. This satisfies the verified UMV-017 outcome.
3. Prepare and print the asset label #
- Place the downloaded QR image into the organisation’s approved label template.
- Keep the QR code square and preserve clear white space around it.
- Do not crop, stretch, rotate or place graphics over the code.
- Add the approved human-readable asset number and label text.
- Select the approved label dimensions, printer and print-quality settings.
- Print a small test batch before producing multiple labels.
- Inspect each test label for sharp edges, contrast and complete printing.
- Scan every test label before applying it to an asset.
Do not use screenshots of the QR preview as production labels when a downloadable QR file is available. Screenshots can introduce scaling or compression that reduces scan reliability.
Placement guidance #
- Clean and dry the surface before applying the label.
- Avoid curved, reflective, high-temperature or frequently abraded areas where possible.
- Do not cover safety instructions, serial plates or regulatory markings.
- Place the label where users can scan it safely without climbing or entering a hazard zone.
- Use a durable overlay or approved label material for outdoor or harsh environments.
4. Test the QR code #
- Sign in to the supported AssetIQ mobile workflow using an authorised test account.
- Scan the printed QR code.
- Confirm that the scan opens the intended asset record.
- Compare the displayed asset identifier with the physical label.
- Confirm that the user sees only information and actions allowed by their role.
- Repeat the scan at typical working distance and lighting.
- Record the result and replace the label if scanning is unreliable.
UMV-018 is Verified / Pass: scanning an AssetIQ QR code opens the correct authorised asset record and respects access rules.
5. Replace or reprint a label #
- Reconfirm the asset record before generating a replacement.
- Remove or clearly invalidate the damaged or superseded label.
- Generate and download the QR code from the current asset record.
- Print and scan-test the replacement before applying it.
- Dispose of obsolete labels according to organisational security requirements.
6. Troubleshooting #
The QR action is unavailable #
- Confirm that you opened an existing asset rather than an unsaved new record.
- Ask an administrator to confirm your role and organisational scope.
The downloaded QR file will not open #
- Download the file again and wait for completion.
- Try the organisation’s supported browser and confirm downloads are permitted.
- Record the asset and error details before contacting support.
The printed label will not scan #
- Open and test the downloaded image to separate a file issue from a print issue.
- Reprint without cropping or stretching, using higher quality and stronger contrast.
- Increase the physical QR size if it is below the approved label specification.
- Move the label away from glare, curvature, dirt or damage.
The wrong asset opens #
- Stop using the label immediately.
- Recheck the selected AssetIQ record and remove the incorrect label.
- Generate, print and test a replacement from the correct record.
- Report repeated mismatches with evidence to the AssetIQ administrator.
7. Related articles #
Add your first asset
Find and filter assets
Scan an asset QR code


