
Create and verify an asset record in AssetIQ
An asset record brings together the identity, classification, ownership, location and operational information required to manage a physical asset throughout its lifecycle.
1. Before you add an asset #
Set up master data first
Before adding an asset, confirm that the required categories, locations, business units and other reference values are available in AssetIQ.
If a required value is missing, ask an administrator to create or activate it. Do not select an incorrect value simply to complete the record.
Prerequisites #
- Your user role permits asset creation.
- The required entity, location and department values exist.
- The relevant asset category and related classifications exist.
- You have the approved asset name, identifier and available serial or registration information.
- You have confirmed that the asset does not already exist.
Search before creating. Duplicate asset records can cause incorrect counts, maintenance history, audits, assignments and reporting.
Information to prepare #
| Information group | Examples | Guidance |
| Identity | Asset name, asset number, serial or registration number | Use the approved naming and identification standard. |
| Classification | Category, type, manufacturer or model | Select existing master data; do not create near-duplicates. |
| Organisation | Entity, department, location or responsible area | Choose the scope in which the asset will be managed. |
| Lifecycle | Acquisition, commissioning, status or condition information | Enter only information supported by approved records. |
| Supporting content | Photographs, documents or notes | Use current files that do not expose unrelated sensitive data. |
2. Add the asset #
- Sign in to AssetIQ.
- Open the Asset Management or Assets area available to your role.
- Search using the asset identifier, serial number, registration number or name to confirm that a record does not already exist.
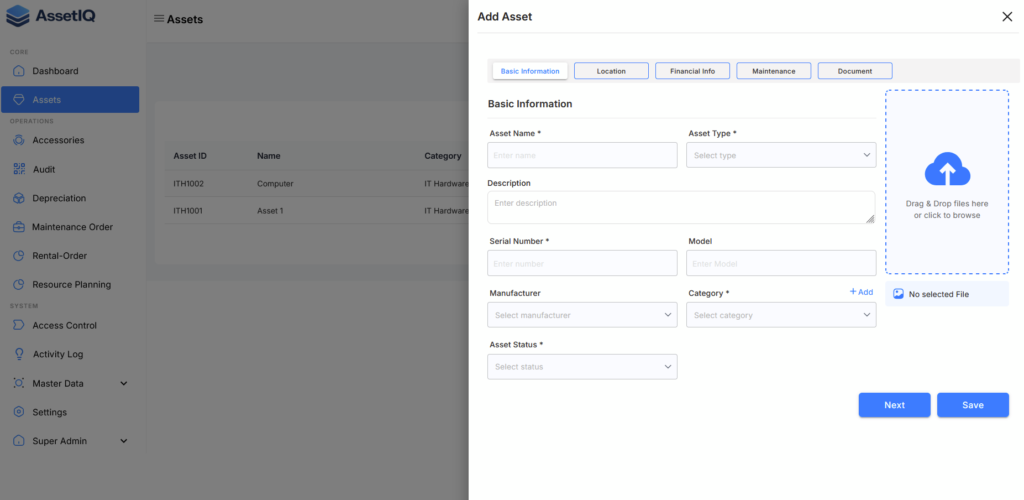
- Select the action to create a new asset.
- Complete every field marked as required.
- Select the approved classification, organisation and location values.
- Add any available optional information that is accurate and useful.
- Review the record for spelling, duplicate identifiers and incorrect selections.
- Save the asset.
- Confirm that AssetIQ creates the record and assigns or displays its unique identifier.
Expected result #
The asset is saved once, has a unique AssetIQ identifier, appears in the asset list and can be found using its key identifying information.
3. Verify the new asset #
- Return to the asset list.
- Search for the new asset using its AssetIQ identifier or another unique value.
- Open the record.
- Compare the saved values with the approved source information.
- Confirm that the entity, department and location are correct.
- Confirm that the asset appears in the appropriate filtered list and is available only to authorised users.
4. Correct asset information #
If you identify an error after saving, edit the existing record rather than creating another asset.
- Open the asset record.
- Select the edit action available to your role.
- Change only the incorrect or approved fields.
- Review the revised information.
- Save the record.
- Refresh or reopen the asset and confirm that the new values are retained.
- Review asset history where available to confirm that the change is traceable.
Do not change a unique identifier, entity or ownership-related value without confirming the effect on integrations, QR codes, audits, assignments and history.
5. Find and filter assets #
- Use a unique identifier for the most precise search.
- Use the asset name, serial number or registration number when supported by the search.
- Apply one filter at a time when investigating unexpected results.
- Confirm the entity, department, location, category and status filters.
- Clear filters to restore the complete list available to your role.
Expected search behaviour #
Only records matching the search and active filters appear. Clearing the search and filters restores the asset list available within the user’s permissions and data scope.
6. Next actions #
After confirming the asset record, complete the next actions required by your organisation and enabled AssetIQ modules.
| Next action | When to use it | Related guide |
| Attach documents or photographs | When supporting evidence, certificates or reference files are required. | Manage asset documents and attachments |
| Generate a QR code | When the asset needs a scannable label for identification. | Generate and use asset QR codes |
| Assign the asset | When a person, project, location or entity becomes responsible for it. | Assign or transfer an asset |
| Set maintenance information | When scheduled or preventive maintenance applies. | Create and manage work orders |
7. Troubleshooting #
The create action is unavailable #
- Confirm that your role permits asset creation and that you selected the correct working context.
- Ask an administrator to review your access.
A required selection is missing #
- Confirm that the value exists, is active and belongs to the correct entity or location.
- Refresh or reopen the form after master-data changes.
The asset will not save #
- Review required fields, validation messages and possible duplicate identifiers.
- Correct the highlighted information and save again.
- Record the error and contact support if the issue continues.


