
Prepare, validate and upload multiple asset records
Use asset import when you need to create multiple AssetIQ asset records efficiently. A successful import depends on an approved template, clean source data and master-data values that match the target AssetIQ environment.
1. Before you import #
Prepare master data before importing
Values in the import file must match the active AssetIQ master data. Confirm that all required categories, locations, business units and other reference values exist before uploading the file.
Prerequisites #
- Your role permits asset import.
- The target entity, locations, departments, categories and other required master data exist.
- You have the current AssetIQ import template for the approved release.
- The source information has been reviewed by the responsible business owner.
- You can identify a small representative sample for the first test import.
Always use a freshly downloaded or approved template. Do not reuse an old template after AssetIQ fields or validation rules have changed.
Recommended import controls #
| Control | Purpose | Recommended action |
| Source copy | Preserves the information received from the business. | Keep an unchanged copy before cleansing. |
| Working copy | Provides a controlled file for corrections. | Record who prepared and approved it. |
| Small test batch | Confirms mappings and validation before a large upload. | Import representative records first. |
| Reconciliation | Confirms that expected records were created once. | Compare source, result and asset list totals. |
| Evidence | Supports audit and troubleshooting. | Retain template, result and error files. |
2. Prepare the import file #
- Download or obtain the current approved AssetIQ asset-import template.
- Save a working copy using a controlled filename.
- Read the instructions included with the template, if provided.
- Enter one asset per row.
- Complete every mandatory column.
- Use master-data values exactly as they appear in AssetIQ.
- Check date, number and identifier formats.
- Remove blank test rows, formulas, comments and unsupported formatting unless the template specifically requires them.
- Search AssetIQ for possible duplicate identifiers before upload.
- Review and approve the completed file.
Do not rename, delete or reorder template columns unless the approved template explicitly permits it. Do not add confidential information to free-text fields.
Data-quality checks #
- Mandatory values are complete.
- Identifiers and serial/registration values are unique where required.
- Names and codes follow the approved conventions.
- Entity, location, department and category values exist in AssetIQ.
- No hidden rows, merged cells or unexpected blank records remain.
- Dates and numeric values are stored in the required format.
3. Import the assets #
- Sign in to AssetIQ.
- Open the asset-import area available to your role.
- Download the current template if the screen provides that option and compare it with your working file.
- Select the action to upload or import assets.
- Choose the prepared file.
- Review any displayed file summary, mapping or validation information.
- Start the validation or import process.
- Wait for AssetIQ to display the result. Do not repeatedly submit the same file while processing.
- Record the number of successful, failed and skipped rows shown by the result.
- Download or retain the result/error file when available.
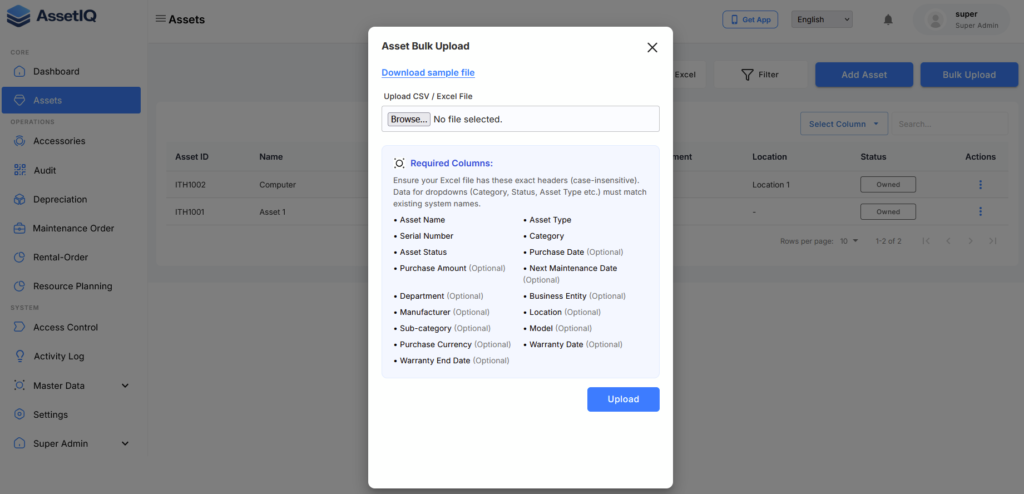
Expected result #
Each valid row creates one asset record. Invalid rows are identified with enough information for the user to locate and correct the source data without unintentionally loading duplicates.
4. Understand and correct import errors #
| Error type | What to check | Corrective action |
| Missing required value | The row and mandatory column identified by validation. | Enter the approved value and validate again. |
| Invalid master data | Spelling, code, entity or scope of the selected value. | Use the exact active AssetIQ value or complete approved setup. |
| Duplicate identifier | Existing AssetIQ records and duplicate rows in the file. | Correct the identifier or remove the duplicate row. |
| Invalid format | Date, number, text length or other format rule. | Convert the value to the required template format. |
| Permission or scope | User role and target entity/location access. | Use an authorised account or correct the approved scope. |
Correct and reimport failed rows #
- Save the original result and error information.
- Identify which rows succeeded before preparing another file.
- Create a correction file containing only rows that still require import.
- Correct each reported error without changing already approved data unnecessarily.
- Validate the correction file and search for possible duplicates.
- Import the corrected rows.
- Retain the correction file and final result as evidence.
Do not reimport the complete original file unless AssetIQ’s confirmed behaviour prevents duplicate creation. Use failed-row correction files as the safer default.
5. Reconcile the import #
- Compare the expected source-row count with successful, failed and skipped results.
- Search the asset list for a representative sample of imported identifiers.
- Open sample records and confirm classification, organisation and location information.
- Check that no asset was created more than once.
- Confirm that restricted users cannot see records outside their authorised scope.
- Record the final imported count and unresolved exceptions.
- Store the approved input, result, error and reconciliation evidence.
6. Troubleshooting #
The import action is unavailable #
- Confirm that your role permits asset import and that the target organisational context is correct.
- Ask an administrator to review your access.
The file is rejected #
- Confirm that it is the current approved template and file type.
- Confirm that headers and required worksheet structure are unchanged.
- Remove unsupported protection, macros or formatting.
The same error affects many rows #
- Check whether a shared master-data value or format is incorrect.
- Correct the source consistently rather than editing individual rows differently.
- Run a small test batch before resubmitting the larger file.
7. Related articles #
- Set up master data
- Add your first asset
- Find and filter assets


