
Create a work order in AssetIQ when maintenance, servicing or repair work needs to be planned, assigned and tracked against an asset.
A successfully created work order receives a unique identifier and an initial status based on your organisation’s approved workflow.
Before you begin #
Make sure that:
- The asset already exists in AssetIQ.
- You have permission to create work orders.
- You have confirmed the maintenance requirement.
- The required maintenance master data is available.
- The responsible person or team exists in AssetIQ.
- Planned dates and priority have been confirmed where required.
- An equivalent open work order does not already exist.
Important: Search for existing work orders before creating a new one. Duplicate work orders can result in repeated maintenance activities and inaccurate reporting.
Find the asset #
Before creating a work order, confirm the asset requiring maintenance:
- Sign in to AssetIQ.
- Open Asset Management from the sidebar.
- Open the asset list.
- Search for the asset using its name, asset number, serial number or another supported identifier.
- Open the asset record.
- Confirm that it is the correct asset.
- Review existing maintenance information and open work orders where available.
You may also be able to create a work order directly from the Maintenance or Work Orders area, depending on your AssetIQ configuration.
Start a new work order #
- Open Maintenance or Work Orders from the sidebar.
- Open the work-order list.
- Select the available action to create a new work order.
- Confirm that the work-order form is displayed.
Before publishing this article, confirm the exact menu and button names used in the current AssetIQ interface.
Select the asset #
- Locate the asset field.
- Search for the required asset.
- Select the correct record.
- Compare the displayed asset name or identifier with the physical or reported asset.
- Confirm that the asset belongs to the correct organisation, entity and location.
Do not continue if you cannot confirm the correct asset.
Enter the work-order information #
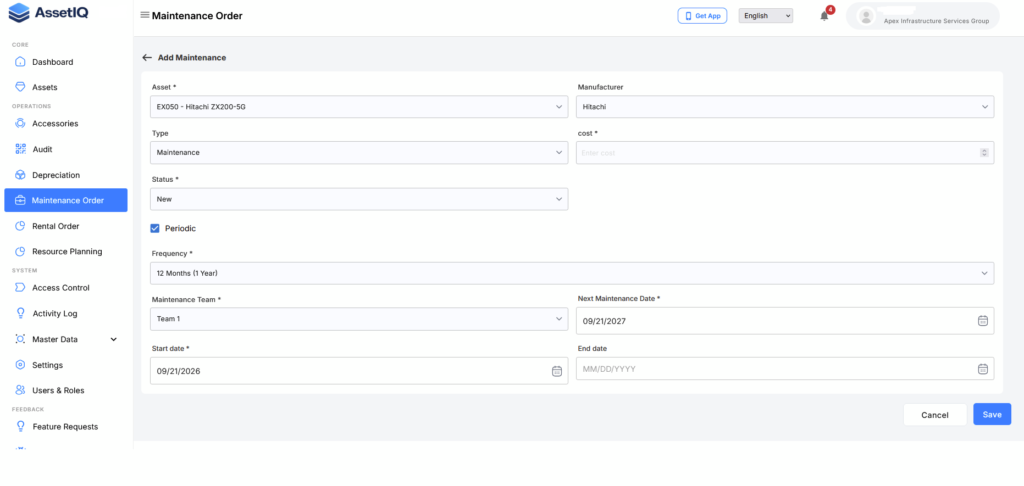
Complete the mandatory work-order fields.
Depending on your AssetIQ configuration, this information may include:
- Work-order title
- Maintenance type
- Work description
- Asset
- Priority
- Planned start date
- Planned completion date
- Responsible person or team
- Organisation, entity or location
- Additional instructions
- Supporting notes
Use a clear title and description so that the assigned user understands the required work.
Write a clear work description #
The work description should explain:
- What problem or maintenance requirement was identified
- What work needs to be performed
- Relevant symptoms or observations
- Any operational or safety considerations
- Required inspection, repair or replacement activity
- The expected outcome
Avoid vague descriptions such as “repair asset” or “check equipment” when more specific information is available.
Set the priority #
Select the priority that reflects the operational impact and urgency of the work.
Consider:
- Safety implications
- Asset availability
- Operational disruption
- Risk of additional damage
- Scheduled maintenance requirements
- Required completion dates
Follow your organisation’s approved priority definitions. Do not mark routine work as urgent unless the situation meets the required criteria.
Assign the work order #
Where assignment is available:
- Locate the assignee or responsible-team field.
- Search for the appropriate user or team.
- Confirm that the selected assignee has the required responsibility.
- Check the planned dates.
- Add clear instructions for the assigned user.
If the required assignee is unavailable, ask an administrator or maintenance coordinator to review the user configuration.
Add attachments #
Where supported, attach relevant evidence such as:
- Photographs
- Inspection results
- Service reports
- Supplier information
- Technical instructions
- Other approved maintenance documents
Do not upload confidential, personal or unrelated information.
Review and create the work order #
Before saving:
- Confirm that the correct asset is selected.
- Review the work-order title and description.
- Check the maintenance type and priority.
- Confirm the planned dates.
- Review the assigned person or team.
- Confirm that mandatory information is complete.
- Check the attachments.
- Select Save, Create or the equivalent available action.
AssetIQ should create the work order and assign a unique identifier.
Confirm the work order was created #
After saving:
- Confirm that the work-order details page opens.
- Record or review the work-order identifier.
- Confirm the initial status.
- Check that the correct asset is linked.
- Confirm that the assignee, priority and planned dates are correct.
- Return to the work-order list.
- Search for the new work order.
- Confirm that it appears in the expected list.
The asset is unavailable #
If you cannot select the required asset:
- Confirm that the asset is active.
- Search using another identifier.
- Clear any active filters.
- Confirm your access to the asset’s organisation, entity or location.
- Ask an administrator to review the asset record and your permissions.
The assignee is unavailable #
If the responsible user or team does not appear:
- Confirm that the user is active.
- Check that the user belongs to the correct organisation or entity.
- Confirm that the user has the appropriate role.
- Ask an administrator or maintenance coordinator to review the configuration.
The work order will not save #
If AssetIQ does not create the work order:
- Check for highlighted mandatory fields.
- Review validation messages.
- Confirm that the selected asset is valid.
- Check date formats and date sequence.
- Confirm that the selected master-data values are active.
- Remove unsupported characters or files.
- Refresh the form and try again.
Record the validation message and affected field before contacting your administrator or support team.
A similar work order already exists #
If you find an existing work order for the same activity:
- Do not create another work order.
- Open the existing record.
- Confirm that it relates to the same asset and maintenance requirement.
- Update or reassign it if you have permission.
- Contact the maintenance coordinator if you are unsure which record to use.
Next steps #
- Update and Complete a Work Order — Record progress and complete the maintenance work.
- Understand Work-Order Statuses — Learn how work orders move through their lifecycle.
- Review the Next Maintenance Date — Confirm the next scheduled maintenance date.
- Introduction to Maintenance and Work Orders — Review the overall maintenance process.
- Find and Filter Assets — Locate the asset requiring maintenance.


