
Provide appropriate, controlled access to AssetIQ
AssetIQ administrators can create or invite users, assign appropriate roles and restrict access according to organisational responsibilities. Access should always be limited to what each person needs for their work.
1. Understand users, roles and access #
| Access component | Purpose | Administrator responsibility |
| User account | Identifies the person who signs in to AssetIQ. | Use the correct business identity and keep account status current. |
| Role | Groups the modules and actions available to a user. | Assign the role that most closely matches the person’s duties. |
| Department access | Limits or grants visibility according to departmental responsibility. | Select only the departments the user is authorised to access. |
| Entity or location scope | Controls data visibility where organisational scoping is configured. | Confirm the correct operational scope before activation. |
Use least privilege: give users only the access required for their current responsibilities. Avoid assigning broad administrator access for convenience.
Before inviting a user #
- Confirm the person’s name and business email address.
- Confirm the required role with the user’s manager or process owner.
- Identify the departments, entities or locations the user should access.
- Check whether an account already exists for the same person.
- Confirm who will approve elevated or administrator access.
2. Invite or create a user #
- Sign in with an account authorised to manage users.
- Open the user-administration area.
- Search for the person to avoid creating a duplicate account.
- Select the action to add or invite a user.
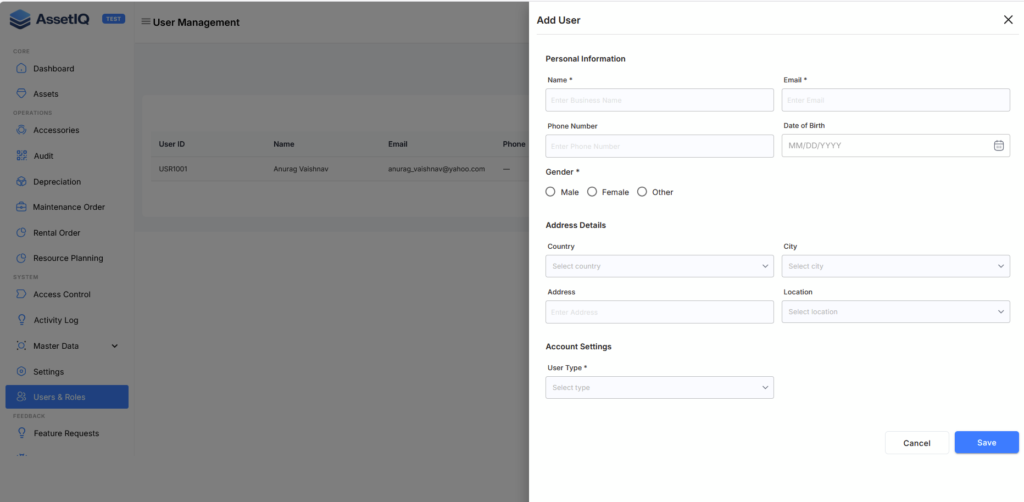
- Enter the user’s required identity and contact information.
- Select the appropriate role.
- Assign the required department, entity or location access where those controls are available.
- Review the information and submit the invitation or create the account.
- Confirm that the new user appears in the user list with the expected status.
3. Assign or change a role #
A role determines which AssetIQ modules and actions are available. Change a role only after the user’s responsibilities and approval have been confirmed.
- Open the user-administration area.
- Search for and open the correct user.
- Review the user’s current role and data scope.
- Select the approved role.
- Review department, entity and location assignments for consistency with the new role.
- Save the changes.
- Ask the user to sign out and sign in again if the new access is not immediately visible.
- Verify the user’s navigation and permitted actions using a controlled test.
Expected result #
The user can sign in and see only the modules, actions and organisational data permitted by the assigned role and access scope.
4. Configure department access #
Department access can affect which records a user can view or manage. Apply it consistently with the approved organisational responsibility model.
- Assign only the departments required by the user’s role.
- Check whether access is view-only or also permits creating, editing or approving records.
- Test a permitted department and a restricted department.
- Review department access whenever the user transfers roles or teams.
- Document exceptions that provide access outside the user’s normal department.
Never assume that a role alone provides the correct data scope. Review role permissions and department/entity/location access together.
5. Test the user’s access #
| Test area | Confirm | Evidence |
| Sign-in | The account can access the correct tenant. | Successful landing-page screenshot |
| Navigation | Only authorised modules are visible. | Sidebar comparison |
| Actions | Permitted actions work and restricted actions are unavailable. | Representative action screenshots |
| Department scope | Permitted records are visible and restricted departments are not. | Controlled segregation test |
| Entity/location scope | No unintended cross-entity or cross-location access exists. | Scope comparison |
6. Update or deactivate a user #
- Open the user-administration area and find the user.
- Confirm the requested access change or departure with the authorised owner.
- Update the role and scope, or deactivate the account as required.
- Save the change.
- Confirm that removed permissions or deactivated access no longer work.
- Retain the account history according to the approved policy rather than creating unnecessary duplicate users.
When to review access #
- A user joins or leaves the organisation.
- A user changes role, department, entity or location.
- A temporary assignment ends.
- Elevated access is no longer required.
- A periodic access review is due.
- An access concern or security incident is reported.
7. Troubleshooting #
The invitation was not received #
- Confirm the email address entered for the account.
- Ask the user to check spam or junk folders.
- Confirm whether the invitation is pending, expired or already accepted.
- Resend the invitation only through the approved application process.
The user cannot see a required module #
- Confirm the assigned role and account status.
- Confirm any department, entity or location scope.
- Ask the user to sign out and sign in again.
- Compare access with a controlled user assigned to the same role.
The user can see too much information #
- Remove or reduce access immediately when inappropriate visibility is confirmed.
- Review role permissions and all data-scope assignments.
- Test department, entity and location segregation.
- Record and escalate the issue according to the security process.
8. Related articles #
- Sign in to AssetIQ
- Understand the AssetIQ dashboard
- Set up master data
- Manage entities and locations
- Reset your AssetIQ password


