
Overview #
Create an asset audit when your organisation needs to verify physical assets against the information recorded in AssetIQ.
When creating an audit, you define its purpose and scope, provide the required audit information and assign responsibility to an appropriate user.
Before you begin #
Before creating an asset audit, make sure that:
- The assets being audited already exist in AssetIQ
- Asset locations, categories and other relevant master data are current
- The appropriate audit type is available
- The intended auditor has the required permissions
- The audit scope and expected completion requirements are understood
To learn more about available audit classifications, see Understand Asset Audit Types.
Permissions: The options available on your screen depend on your assigned AssetIQ role. Contact your AssetIQ administrator if you cannot create or assign an audit.
Create an asset audit #
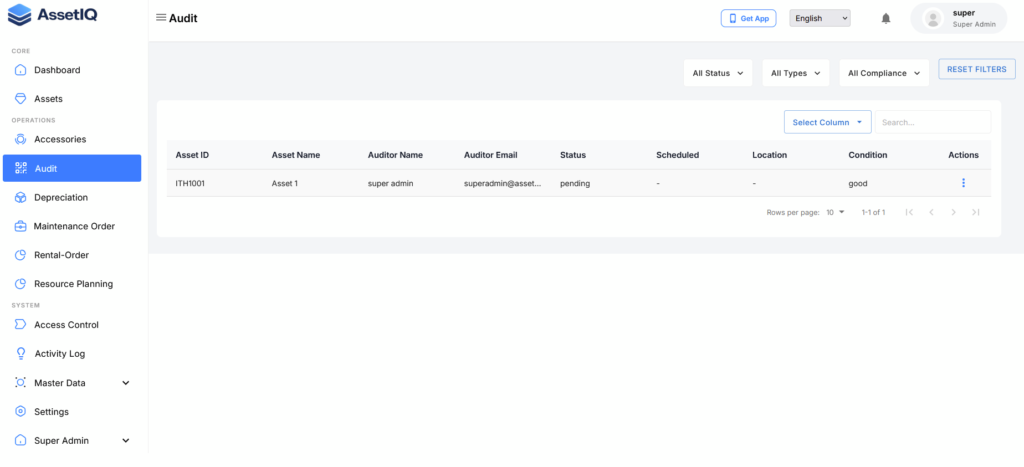
Step 1: Open Asset Audits #
- Sign in to AssetIQ.
- From the sidebar, open Asset Audits.
- Open the audit list.
- Select Create, Add Audit or the corresponding new-audit button shown on the page.
The audit-creation form opens.
Step 2: Enter the audit details #
Complete the required information on the audit form.
Depending on your organisation’s configuration, this may include:
- Audit name or title: Enter a clear name that identifies the audit.
- Audit type: Select the type that best represents the purpose of the audit.
- Description: Explain why the audit is being conducted.
- Location: Select the relevant site or location, where applicable.
- Business unit: Select the responsible organisational unit, where applicable.
- Start date: Enter the planned start date if this field is available.
- Due date: Enter the expected completion date if required.
Use a meaningful audit name that users can easily recognise. For example:
- Melbourne Warehouse Quarterly Audit
- IT Equipment Annual Verification
- Project Site Asset Spot Check
- Operations Business Unit Audit
Tip: Avoid names such as “New Audit” or “Asset Check.” A specific name makes the audit easier to find and understand later.
Define the audit scope #
The audit scope determines which assets must be verified.
Depending on the available AssetIQ options, you may be able to select assets using criteria such as:
- Location
- Business unit
- Asset category
- Asset status
- Individual assets
- Another organisational grouping
Review the selected criteria carefully before continuing.
Check the selected assets #
Where AssetIQ displays a list of assets included in the audit:
- Review the asset list.
- Confirm that the expected assets are included.
- Check that unrelated assets have not been selected.
- Adjust the audit criteria if the results are incorrect.
- Confirm the final audit scope.
A well-defined scope helps prevent assets from being missed or audited unnecessarily.
Important: Updating an asset record after the audit has been created may not automatically change the audit’s existing scope. Review the selected assets before assigning or starting the audit.
Assign the audit #
Select the user responsible for conducting the audit.
Before assigning it, confirm that the user:
- Is responsible for or familiar with the selected assets
- Can access the relevant location
- Has permission to view and conduct asset audits
- Understands the audit scope
- Can complete the audit within the required period
If AssetIQ allows multiple users or a team to be assigned, follow your organisation’s process for dividing responsibility.
Review the audit #
Before saving or issuing the audit, verify the following:
- The audit name clearly describes its purpose
- The correct audit type has been selected
- The asset scope is accurate
- The appropriate user has been assigned
- The planned dates are correct, where applicable
- Any instructions or supporting information have been included
Correcting these details before the audit begins helps prevent confusion and incomplete results.
Save the audit #
After reviewing the information:
- Select Save, Create or the corresponding confirmation button.
- Wait for AssetIQ to confirm that the audit has been created.
- Review the audit record.
- Confirm that the selected assets and assigned user are correct.
The audit should now appear in the Asset Audits list.
Depending on your organisation’s workflow, you may need to perform an additional action to make the audit available to the assigned auditor.
Confirm the assignment #
After creating the audit:
- Open the newly created audit.
- Confirm the assigned user.
- Check the audit’s current status.
- Confirm that it is available to the auditor.
- Notify the assigned user if your organisation’s process requires it.
If the auditor cannot access the audit, check their role, permissions and organisational access.
Edit an audit before work begins #
If you identify an error before the audit starts:
- Open Asset Audits.
- Find and open the relevant audit.
- Select Edit, if available.
- Correct the required details.
- Save the changes.
- Confirm that the updated information is displayed.
Avoid changing an audit’s scope or assignment after verification has started unless your organisation’s procedure allows it.
Common issues #
The required audit type is not available #
Confirm that you selected the correct organisation and review the available audit types. If the required type is still unavailable, contact your AssetIQ administrator.
The auditor does not appear in the assignment list #
The user may be inactive, outside the relevant organisational unit or missing the required role or permissions. Ask your administrator to review the user’s access.
The expected assets are not included #
Check the audit’s selected location, category, business unit or other scope criteria. Also confirm that the asset records contain the correct master-data values.
The Create or Edit button is unavailable #
Your role may not have permission to manage asset audits. Contact your AssetIQ administrator.
The audit was assigned to the wrong user #
If the audit has not started, edit the audit and select the correct user. If verification is already underway, follow your organisation’s process before changing the assignment.
Recommended practices #
When creating and assigning audits:
- Keep each audit’s scope clear and manageable
- Use consistent and descriptive audit names
- Choose the audit type based on its primary purpose
- Assign auditors who understand the relevant assets or location
- Allow sufficient time for physical verification
- Review the selected assets before starting the audit
- Avoid altering the scope after verification begins
- Follow up on audits that remain incomplete
Next steps #
After creating and assigning the audit, continue with:
For an overview of the complete process, see Introduction to Asset Audits.


