Skip to content
No results
  • AssetIQ Help Portal
assetiq logo final horizontal jan 2026 trans website logo
Success Center
  • Home
  • Getting Started
assetiq logo final horizontal jan 2026 trans website logo
Success Center

Getting Started

6
  • Welcome to AssetIQ
  • Sign in to AssetIQ
  • Reset your AssetIQ password
  • Understand the Dashboard
  • Change Your Language in AssetIQ
  • Navigate AssetIQ and Use the Sidebar

Asset Management

8
  • Add Your First Asset
  • Edit an Asset
  • Find and Filter Assets
  • Assign an Asset
  • Import Assets
  • Export Asset Data
  • Generate Asset QR Codes
  • Scan an Asset QR Code

Maintenance

5
  • Introduction to Maintenance and Work Orders
  • Create a Work Order
  • Understand Work-Order Statuses
  • Review the Next Maintenance Date
  • Update and Complete a Work Order

Inspections

8
  • Introduction to Asset Inspections
  • Understand Inspection Types and Checklists
  • Create and Assign an Asset Inspection
  • Conduct and Submit an Asset Inspection
  • Record Inspection Findings and Defects
  • Review and Approve Inspection Results
  • View and Export Inspection Results
  • Create Follow-up Actions or Work Orders

Asset Audits

6
  • Introduction to Asset Audits
  • Understand Asset Audit Types
  • Create and Assign an Asset Audit
  • Conduct and Submit an Asset Audit
  • Review Audit Discrepancies
  • Export Asset Audit Results

Rental Management

12
  • Introduction to Rental Management
  • Understand the Rental Job Lifecycle and Statuses
  • Create a Rental Job
  • Add and Allocate Assets to a Rental Job
  • Check Asset Availability and Resolve Conflicts
  • Dispatch Assets and Start a Rental
  • Extend or Update an Active Rental
  • Return Assets and Record Their Condition
  • Close a Rental Job
  • View and Export Rental History
  • Manage Overdue Rentals and Outstanding Assets
  • Manage Rental Damage and Missing Items

Scheduling & Resources

8
  • Introduction to Scheduling and Resources
  • Understand the Scheduling Calendar
  • Find and Filter Scheduled Activities
  • Schedule Assets and Resources
  • Reschedule or Update an Activity
  • Identify and Resolve Scheduling Conflicts
  • Manage Resource Availability and Unavailability
  • View Asset and Resource Schedules

Reports & Analytics

8
  • Introduction to Reports and Analytics
  • Understand Dashboards and Key Metrics
  • Filter and Analyze Report Data
  • View Asset Management Reports
  • View Maintenance and Inspection Reports
  • View Rental and Utilization Reports
  • Export Report Data
  • Troubleshoot Report and Dashboard Data

Administration

2
  • Set Up Master Data
  • Invite Users and Assign Roles
View Categories
  • Home
  • Documentation
  • Asset Management
  • Edit an Asset

Edit an Asset

2 min read

0:00 / 1:58
  • View as Markdown Open this page as plain Markdown (opens in a new tab)
  • Open in ChatGPT Ask questions about this page (opens in a new tab)
  • Open in Claude Ask questions about this page (opens in a new tab)
  • Open in Google AI Studio Ask questions about this page (Google account required) (opens in a new tab)

You can edit an asset in AssetIQ when its details, classification, location or other information needs to be corrected or updated.

The fields and actions available to you depend on your assigned role and permissions.

Before you begin #

Make sure that:

  • The asset already exists in AssetIQ.
  • You have permission to edit asset records.
  • You know which information needs to be changed.
  • Any required master data has already been configured.

Find the asset #

  1. Sign in to AssetIQ.
  2. Open Asset Management from the sidebar.
  3. Open the asset list.
  4. Search for the asset using its name, asset number, serial number or another available identifier.
  5. Select the correct asset to open its details.

Confirm that you have opened the correct record before making any changes.

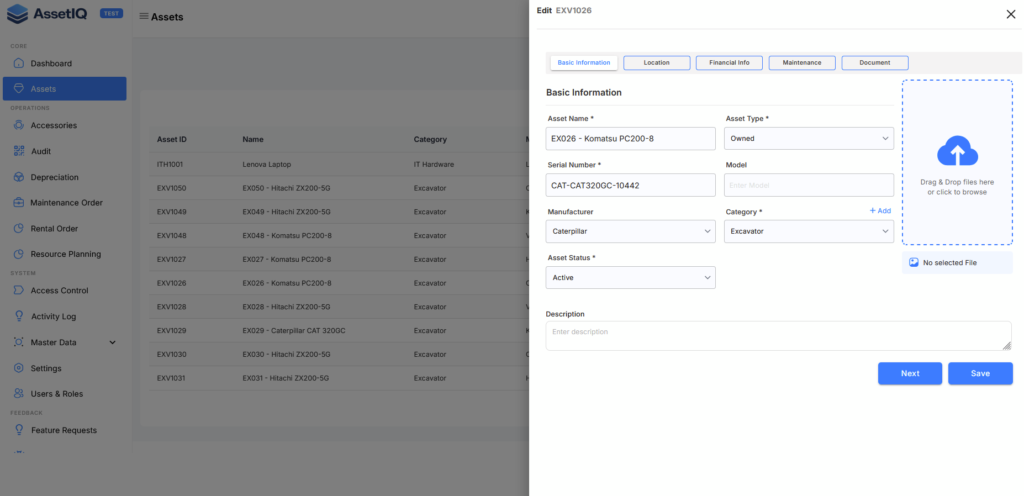
Edit the asset #

  1. Open the required asset record.
  2. Select the available Edit action.
  3. Locate the field that needs to be updated.
  4. Enter or select the correct value.
  5. Review the remaining asset information.
  6. Complete any newly required fields.
  7. Save the asset.

image

AssetIQ should display the updated asset record after the change is saved.

Confirm your changes #

After saving:

  1. Refresh or reopen the asset record.
  2. Confirm that the new value is displayed.
  3. Return to the asset list.
  4. Search for the asset again if the edited information affects its name, identifier or classification.
  5. Confirm that the asset still appears under the correct organisation, entity and location.

You cannot edit the asset #

If the Edit action is unavailable:

  • Confirm that you opened an existing asset record.
  • Check whether your assigned role permits asset editing.
  • Confirm that the asset belongs to an entity or location you are authorised to manage.
  • Ask your AssetIQ administrator to review your permissions.

The asset will not save #

If AssetIQ does not save the changes:

  • Check for highlighted mandatory fields.
  • Confirm that selected master-data values are active.
  • Review identifier, date and number formats.
  • Remove unsupported information from text fields.
  • Record any displayed validation message before contacting support.

Next steps #

  • Find and Filter Assets — Locate assets using search and filters.
  • Assign an Asset — Assign an asset to an approved target.
  • Generate Asset QR Codes — Create and download a QR code for the asset.

Updated on September 1, 2026

What are your Feelings

  • Happy
  • Normal
  • Sad

Share This Article :

  • Facebook
  • X
  • LinkedIn
  • Pinterest
Add Your First AssetFind and Filter Assets

Powered by BetterDocs

Leave a ReplyCancel Reply

Your email address will not be published. Required fields are marked *

Table of Contents
  • Before you begin
  • Find the asset
  • Edit the asset
  • Confirm your changes
  • You cannot edit the asset
  • The asset will not save
  • Next steps

AssetIQ - Success Center

Your go-to resource for AssetIQ documentation, guides, and support. Learn, explore and get the most out of AssetIQ.

    Resources

    • Video Tutorials
    • Release Notes
    • Best Practices
    • FAQs

    Company

    • About AssetIQ
    • AssetIQ Website
    • Privacy Policy
    • Terms of Service

    Copyright © 2026 - AssetIQ by Arvant Technologies Pte Lte