
AssetIQ work-order statuses show the current stage of a maintenance activity. They help users understand whether work is planned, underway, waiting for action or completed.
The current status may also control which actions are available and who can perform them.
Why work-order statuses matter #
Keeping the status current helps your organisation:
- Understand maintenance progress.
- Identify work requiring attention.
- Coordinate assignees and maintenance teams.
- Prioritise overdue or urgent activities.
- Prevent unfinished work from being recorded as complete.
- Maintain accurate asset-maintenance history.
- Produce reliable maintenance reports.
A work-order status should represent the actual condition of the maintenance activity.
How the workflow works #
A typical work-order workflow includes:
- A maintenance requirement is identified.
- A work order is created.
- The work is planned and assigned.
- An authorised user begins the work.
- Progress, findings and delays are recorded.
- The maintenance activity is completed.
- Completion information is reviewed.
- The final work-order record is retained against the asset.
The exact status names and permitted transitions depend on your organisation’s approved AssetIQ configuration.
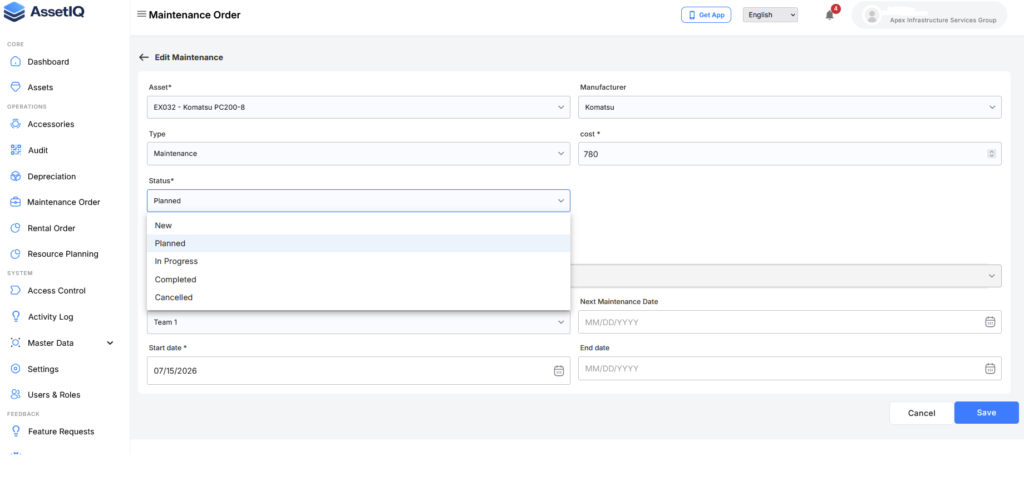
Common status purposes #
Although the names may differ, work-order statuses generally represent the following stages.
New or draft #
The work order has been created but may still require review, planning or assignment.
At this stage, an authorised user may need to:
- Confirm the asset
- Review the work description
- Set the priority
- Enter planned dates
- Assign the responsible user or team
Planned or assigned #
The maintenance work has been reviewed and allocated.
The work order should include:
- The correct asset
- A clear work description
- The responsible person or team
- Planned dates
- The appropriate priority
In progress #
The assigned user or team has started the maintenance activity.
Users should record:
- Work performed
- Findings
- Delays
- Additional requirements
- Relevant notes and attachments
On hold or waiting #
The work cannot currently continue.
Possible reasons include:
- Parts are unavailable.
- Supplier assistance is required.
- The asset is unavailable.
- Approval is pending.
- Additional information is required.
- Operational conditions prevent access.
Record a clear reason and expected next action whenever a work order is placed on hold.
Completed or closed #
The required maintenance activity has been performed and the outcome has been recorded.
Before using the final status, confirm that:
- The required work is complete.
- Completion notes are meaningful.
- The actual completion date is correct.
- Required evidence has been attached.
- No unresolved maintenance activity remains.
- The next maintenance date has been reviewed where applicable.
Do not mark unfinished work as completed.
Cancelled #
The work order will not proceed.
A cancellation reason should be recorded where possible. For example:
- The work order is a duplicate.
- The maintenance activity is no longer required.
- The wrong asset was selected.
- The work has been replaced by another approved record.
Do not cancel a work order merely to remove it from an active list.
View the current status #
- Sign in to AssetIQ.
- Open Maintenance or Work Orders.
- Open the work-order list.
- Search for the required record.
- Review the status displayed in the list.
- Open the work order to review its details and history.
The status shown in the work-order details should match the actual progress of the activity.
Change a work-order status #
- Open the required work order.
- Confirm that it relates to the correct asset.
- Review the current status.
- Confirm that the required work or workflow step has occurred.
- Select the next permitted status or available action.
- Enter required notes, dates or completion information.
- Save the work order.
- Confirm that the new status is displayed.
Only use transitions permitted by the approved workflow.
A required status is unavailable #
If you cannot select the expected status:
- Confirm that the current status permits the transition.
- Check for missing mandatory information.
- Confirm that you have the appropriate role.
- Check whether you are the assigned user.
- Review any displayed validation message.
- Ask the maintenance coordinator or AssetIQ administrator for assistance.
Do not select an inaccurate status simply to progress the work order.
The status appears incorrect #
If the status does not reflect the actual maintenance activity:
- Open the work order.
- Review its progress notes and history.
- Confirm what work has been performed.
- Select the correct permitted status if authorised.
- Add a note explaining the correction where appropriate.
- Contact the maintenance coordinator if the status cannot be corrected.
Best practices #
- Keep the status aligned with actual progress.
- Record meaningful notes before changing status.
- Explain delays and on-hold conditions.
- Do not skip required workflow stages.
- Do not complete unfinished work.
- Avoid cancelling valid maintenance records.
- Review completion information before finalising the work order.
Next steps #
- Create a Work Order — Create and assign maintenance work.
- Update and Complete a Work Order — Record progress and finalise completed maintenance.
- Review the Next Maintenance Date — Confirm the next scheduled maintenance date.
- Introduction to Maintenance and Work Orders — Review the complete maintenance process.


